-
PlayStation Controller Tutorial (Click Here for Other Controllers)
-
Plug your PlayStation controller into your computer. Either connect the controller to your computer using a wired connection or use bluetooth (click here for bluetooth tutorial for PS4 but it's the same steps for PS5). You can connect any PS3, PS4, or PS5 controller to your computer
-
Run DS4. You don't need to remap anything, just run it
If you don't have DS4, go to their website -> click "DOWNLOAD" -> click "DOWNLOAD again -> download it. Extract the folder to your Desktop and simply run "DS4Windows" -> make sure to check all of the Dualsense/PS controller checkboxes and save your data anywhere
-
Make sure that your PlayStation controller is showing in DS4 and using the Default profile that emulates Xbox 360 controller input
-
Run the loader and input your MW3 cheat key. Check the "Controller Support" box and inject

-
After you get "Injection successful!" simply eject your USB and run the game
-
Make sure you go to game Settings -> Controller -> Aiming Input Device -> change to Controller
-
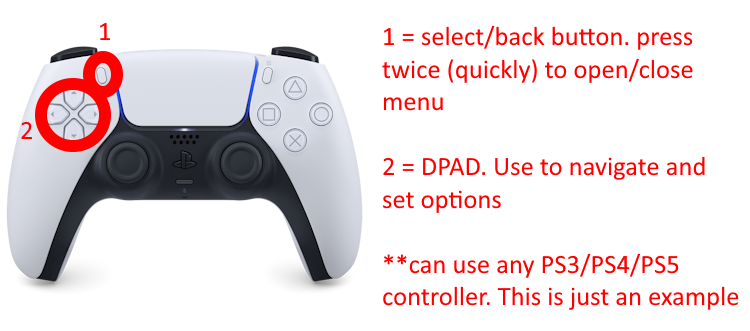
Once the game is open, you can press the back/select button on your controller twice (quickly) to open/close the cheat menu. You have to press the button twice very fast otherwise the menu won't open/close. If you can't see your cheat menu, press Windows Key + D at the same time which will minimize all windows. Then, click back into the game via the taskbar. If that doesn't work, press Windows Key + G at the same time which will open your gamebar. Then, click out of the gamebar
-
Once your menu is open, use your DPAD to navigate the menu and change settings
-
You can set a hotkey by hovering over the option, pressing right on the DPAD, and then the next button on your controller that you press will assign as the hotkey. You can even press down on your analog sticks and assign those (L3 or R3) as hotkeys. Learn more from our config guide here
-
If your aimbot is too strong, raise AIM -> Smoothness until it feels right
-
If your aimbot is too weak, lower AIM -> Smoothness until it feels right. You can also raise MISC -> Framerate slightly
-
Most aimbot options aren't available with controller and will be greyed out. You don't need to worry about those options with controller aimbot. They affect nothing
- If you ever change your MISC -> Framerate setting, you may need to adjust your AIM -> Smoothness again. The MISC -> Framerate of the cheat affects ESP smoothness (smoother when higher) but it also makes the aimbot faster when higher
-
Plug your PlayStation controller into your computer. Either connect the controller to your computer using a wired connection or use bluetooth (click here for bluetooth tutorial for PS4 but it's the same steps for PS5). You can connect any PS3, PS4, or PS5 controller to your computer